In today’s digital economy, online payments are the backbone of every serious business website. Whether you are running an eCommerce store, a SaaS platform, or selling digital products, adding a payment gateway to your website turns visitors into paying customers and makes your brand look professional and trustworthy.
In this detailed guide by EduTech (edutechpk.online), you’ll learn what a payment gateway is, how it works, how to choose the right one, and the practical steps to integrate it into your website safely and efficiently.
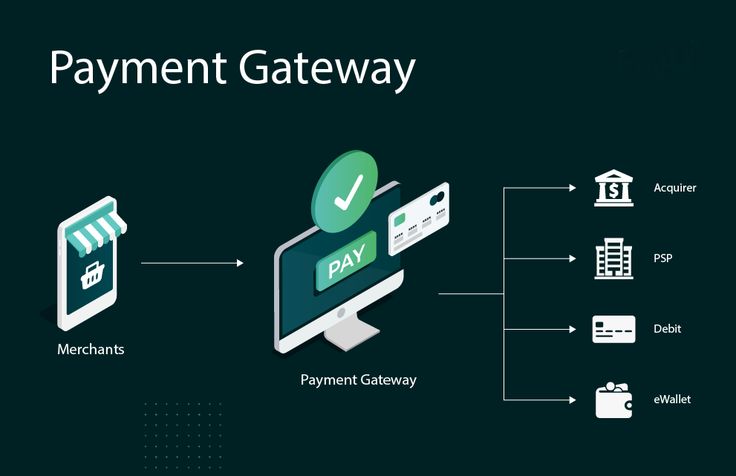
What Is a Payment Gateway?
A payment gateway is the secure bridge between your website, your customer’s bank, and your own bank account. It authorizes online payments made via credit cards, debit cards, digital wallets, and sometimes even bank transfers, then routes the funds to your merchant account.
Whenever a user clicks “Pay Now” on your site, the payment gateway encrypts their sensitive data, checks with the bank if the transaction is valid, and returns a response in just a few seconds. If approved, the order is confirmed and the money starts its journey to your account.
Why Adding a Payment Gateway Is Essential
Adding a payment gateway is not just a technical upgrade; it directly affects your revenue, user trust, and brand image.
- Unlocks online sales: You can accept payments 24/7 from anywhere in the world.
- Builds trust: Secure, familiar payment options reassure customers their data is safe.
- Automates the process: No more manual bank transfers or cash handling.
- Supports analytics: Dashboards help you track transactions, refunds, and trends.
- Ensures compliance: Good gateways help you meet standards like PCI DSS.
Without a reliable payment gateway, your website remains an online brochure instead of a revenue-generating business asset.
How a Payment Gateway Works (Step by Step)
To integrate a gateway properly, it helps to understand what happens behind the scenes during a transaction.
- Customer places an order: They add items to the cart and go to checkout.
- Payment details are entered: Card information or wallet details are filled in on a secure form.
- Data is encrypted: The payment gateway encrypts the data and sends it to the acquiring bank (your bank or payment processor).
- Authorization request: The acquiring bank forwards the request to the card network (like Visa, Mastercard), which then contacts the issuing bank (the customer’s bank).
- Approval or decline: The issuing bank checks for sufficient funds and potential fraud, then approves or declines the transaction.
- Response back to website: The gateway sends the result back to your website, which shows a success or failure message.
- Settlement: If approved, the funds are settled to your merchant account and later transferred to your main business bank account.
All of this typically happens in a matter of seconds, but it relies on secure, well-integrated systems.
Types of Payment Gateways
Different gateways integrate and handle data in different ways. Understanding the main types will help you pick the right approach for your website.
1. Redirect Gateways
With redirect gateways, your user is sent to a third‑party page (like PayPal) to complete payment, then redirected back to your site after success or failure.
- Pros: Very easy to set up; security and compliance handled mostly by the provider.
- Cons: Extra redirect step; checkout feels less “native” and can slightly hurt conversions.
2. On-Site Checkout, Off-Site Processing
Here, customers enter their card details on your own website, but the payment processing still happens on the gateway’s servers via secure APIs.
- Pros: Smooth, branded checkout experience; reduced PCI burden since card data isn’t stored by you.
- Cons: Slightly more technical to integrate than a simple redirect.
3. Fully Integrated (On-Site) Gateways
In this model, everything—from data collection to processing—happens on your servers, with direct connections to banks and processors.
- Pros: Maximum control and customization over the payment experience.
- Cons: Highest responsibility for security, infrastructure, and PCI DSS compliance; usually suitable for large enterprises.
Choosing the Right Payment Gateway
Before you add any payment gateway to your website, compare a few options and see which aligns with your audience, region, and business model.
- Supported payment methods: Cards, wallets (Apple Pay, Google Pay), local methods (like bank transfers or mobile wallets).
- Countries and currencies: Make sure it supports the regions where your customers live.
- Fees and pricing: Look at transaction fees, currency conversion, chargeback fees, and any monthly or setup charges.
- Security and fraud tools: Check for PCI DSS compliance, tokenization, 3D Secure, and fraud detection.
- Ease of integration: Does it offer plugins for your CMS (WordPress, Shopify, etc.) or clean APIs and SDKs for custom code?
- Payout schedule: How quickly will you receive funds in your bank account?
- Support and documentation: Good documentation and responsive support save a lot of headaches.
For example, if you run a small online store built with WordPress and WooCommerce, beginner‑friendly providers like Stripe or PayPal are usually enough to get started quickly.
Preparing Your Website Before Integration
Before you paste any code or install any plugin, your website must meet some basic security and usability requirements.
1. Install an SSL Certificate
An SSL certificate encrypts the connection between your user’s browser and your server. Browsers show a padlock icon for secure sites and may mark non‑HTTPS sites as “Not secure,” which scares buyers away.
2. Use HTTPS on All Checkout Pages
Make sure every page where users enter personal or payment data uses HTTPS and does not load any insecure (HTTP) scripts, images, or resources.
3. Understand PCI DSS Scope
Even if your gateway handles most of the sensitive data, you should still follow basic PCI DSS practices like using strong passwords, limiting access to admin panels, and keeping your server updated.
4. Optimize for Mobile Users
A large portion of users will pay on their smartphones. Your checkout layout, buttons, and forms must be mobile‑friendly, with large tap targets and simple steps.
5. Add Legal and Policy Pages
Clearly display your privacy policy, terms and conditions, refund or return policy, and contact information. This boosts trust and may be required by law in some regions.
Step-by-Step: Adding a Payment Gateway to Your Website
The exact steps depend on your platform and provider, but the overall process usually follows this pattern.
Step 1: Create a Merchant or Business Account
Most payment providers require you to create a business profile and verify your identity. Some act as both the payment gateway and merchant account, while others connect to a separate merchant bank account.
Step 2: Choose Your Integration Method
Decide whether you want a simple redirect checkout, an embedded form provided by the gateway, or a fully custom integration using APIs. For most small to medium websites, redirect or embedded options are ideal.
Step 3: Obtain API Keys or Install a Plugin
Once your account is approved, you’ll get integration credentials (like a public key and a secret key). On platforms like WordPress, you often just install an official plugin and paste these keys into the plugin settings.
Step 4: Configure Webhooks (Optional but Recommended)
Webhooks allow the payment gateway to notify your website about events such as successful payments, failed attempts, or refunds. This helps you automatically update order statuses and send confirmation emails.
Step 5: Test in Sandbox Mode
Always use the provider’s sandbox or test mode first. Use test card numbers to simulate success, failure, and edge cases like declined cards so you can see how your site responds.
Step 6: Switch to Live Mode
Once everything behaves correctly in the test environment, switch to live mode, double‑check your API keys, place a small real transaction, and verify that it appears correctly in your dashboard and on your site.
Integration on Popular Platforms
Here is a quick look at how integration typically works on common website platforms.
- WordPress / WooCommerce: Install the payment gateway plugin, enter your API keys, enable test mode, set up webhooks if needed, then switch to live.
- Shopify: Use built‑in Shopify Payments or third‑party gateways via the admin panel, then configure accepted payment methods and currencies.
- Custom PHP / Node / Python sites: Use the provider’s REST API or SDK library, create backend routes for creating payment sessions, and add a secure frontend form or checkout component.
No matter which platform you use, always follow the official documentation from your chosen gateway.
Security Best Practices for Online Payments
Payment security is critical. A single security breach can damage your reputation and lead to financial and legal consequences.
- Use HTTPS everywhere: Not only on checkout, but ideally on your entire site.
- Enable tokenization: Let the gateway store or tokenize card details instead of keeping them on your servers.
- Turn on 3D Secure / OTP: Extra authentication steps reduce fraud and chargebacks.
- Keep software updated: Update your CMS, plugins, and server regularly to patch vulnerabilities.
- Monitor logs and alerts: Watch for unusual spikes in failed payments or suspicious activity.
If you handle any user data, also review privacy regulations that apply to your region and your customers.
Improving the Checkout Experience
A working payment gateway is only half the job. The design of your checkout flow directly influences how many visitors actually complete their purchase.
- Minimize form fields: Only ask for information you truly need.
- Allow guest checkout: Don’t force users to create an account before paying.
- Show clear prices and totals: Include taxes, shipping, and final amount before the user clicks “Pay”.
- Offer multiple options: Provide at least one card option and one wallet or local method.
- Display trust badges: Logos of payment providers and security certificates can reassure hesitant buyers.
Even small improvements in your checkout design can significantly increase your conversion rate.
Handling Refunds, Chargebacks, and Disputes
Once you start accepting payments, you must be prepared to handle refunds and chargebacks professionally.
- Set a clear refund policy: Explain when and how refunds are issued.
- Use your gateway’s dashboard: Most providers let you process full or partial refunds with a few clicks.
- Respond quickly to disputes: Provide invoices, order details, and delivery proofs to your gateway or bank.
- Communicate with customers: Many conflicts can be resolved through good customer support before they become formal chargebacks.
Legal and Compliance Considerations
Beyond technology, online payments are governed by financial and consumer protection laws, which may vary by country.
- PCI DSS: Follow security standards for handling card data, even if most data stays with the gateway.
- KYC and business verification: Be ready to provide business documents, IDs, and bank details when requested by the provider.
- Privacy laws: Consider regulations like GDPR or similar local laws when storing personal information.
- Transparent terms: Make sure users can easily access your terms, policies, and contact methods.
Future Trends in Payment Gateways
Payment technology is constantly evolving, and choosing a modern gateway helps keep your site future‑proof.
- Digital wallets and BNPL: Wallets and “buy now, pay later” options are becoming standard.
- Crypto and alternative payments: Some gateways are starting to support crypto payments with instant conversion to traditional currency.
- AI‑driven fraud prevention: Machine learning helps reduce fraud and false declines.
- Embedded and invisible payments: Seamless experiences where payment happens in the background, like in ride‑hailing apps.
As these trends grow, using a flexible gateway will make it easier to add new payment options without rebuilding your entire system.
Final Thoughts
Adding a payment gateway to your website is a key step in turning your online presence into a real business. By choosing a trusted provider, preparing your site for security and compliance, integrating carefully, and optimizing your checkout experience, you can offer your customers a smooth and safe way to pay you online.
Start with one reliable gateway, test thoroughly, and improve your flow over time. As your business grows, you can expand to more payment methods, currencies, and advanced features.
Keep learning with EduTech – edutechpk.online and stay ahead in building secure, modern, and profitable web experiences.
← Back